Feature available for all plans: Free – Up to 100 pins | Essential – Up to 1,000 pins | Pro – Up to 10,000 pins | Advanced – Up to 100,000 pins
Whether you want to look at your portfolio of customers or your suppliers’ locations, the ability to add pins to a map can be a key functionality for analyzing your catchment area.
With smappen, for more detailed analysis, you can import your own pins onto the map from an Excel file.
Before starting, don’t hesitate to check the page to prepare your file for import.
📖 TRANSCRIPT
Smappen currently offers two ways to import your data:
– Upload an Excel file
– Or connect your HubSpot CRM to automatically sync your lists of contact and company
Here, we’ll focus on importing from an Excel file. The HubSpot integration is covered in a separate video.
Now, let’s look at a concrete example:
Here’s a sample Excel file: it contains the client’s name, creation date, the address (used to geolocate the data—this can be a full address, a ZIP code, a city, or even GPS coordinates), and finally, revenue data. Of course, this is just a template. You can customize your file by adding any information that matters to you—there’s no limit to the number of columns you can import.
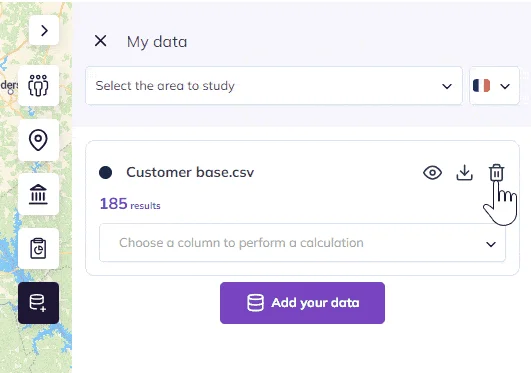
Once your file is ready, go to “My Data” and click “Add your data.” Here you’ll find all the files already imported into your account. To add a new one, click “Import my data.”
Next, select “Import file.” Simply drag and drop your Excel file.
The next step is to define which column (or columns) in your file correspond to the address. You can also add the country. Then, click “Finish import.”
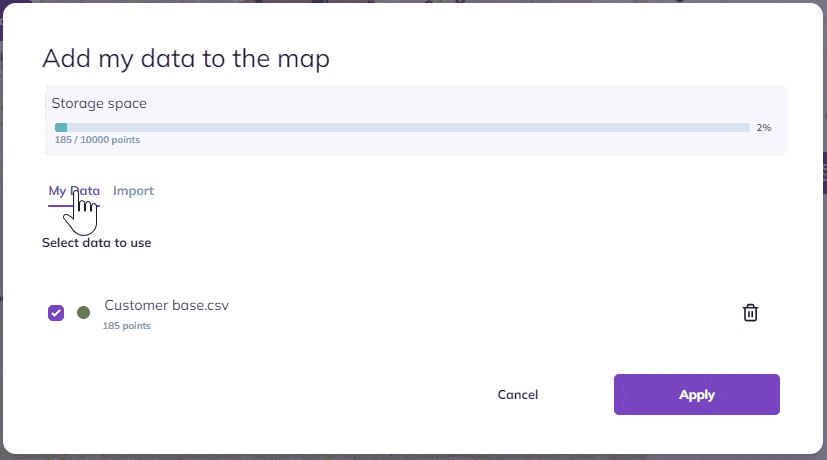
Your file is now uploaded to your account. All that’s left is to click “Apply”.
The points will then appear on the map. Just like with points of interest, you can click on each one to view its details.
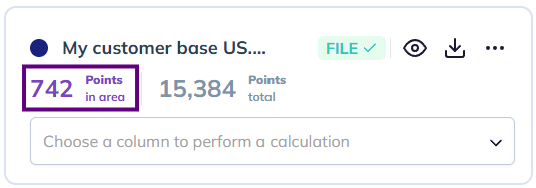
On the right-hand side, you’ll see the total number of points in your area, along with a calculation tool that lets you instantly get the sum and average of your sales—or any other numeric data you’ve imported.
And that’s it—you now know how to import your data with Smappen
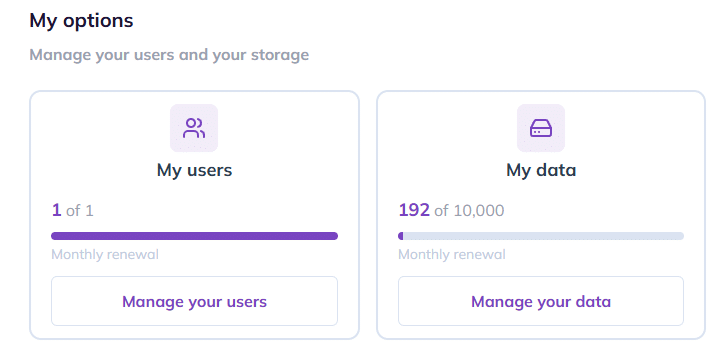
Data import limit on your account #
You can import as many dataset files as you want, up to a total limit according to your plan:
- Free plan: Up to 100 pins
- Essential plan: Up to 1,000 pins
- Pro plan: Up to 10,000 pins
- Advanced plan: Up to 100,000 pins
A gauge is available in the “Add your Data” window.
Once the limit is reached, you won’t be able to add new dataset to the account.
You will need to delete one or more dataset files to add new ones.

Note: This pins limit applies to the entire company account. This includes your personal access + the access of all users associated to your profile.
Reached your import limit? #
You can delete a dataset from your account, or increase your data limits with add-on packages of 10,000 points for $30/month. Manage your data limit in My Profile > My Subscription.
Delete a dataset from your map: #
To delete a dataset from one of your map, in the “My data” tab, click on the trash icon on your dataset.
Please note: the data set is deleted from your map but not from your account. If it has been added to other maps, it remains available on them.
Delete a dataset from your account: #
1 – On one of your maps, open the “My Data” tab on the right panel.
2 – Click on “Add your data.”
3 – In “My Data” you can see all datasets available on your account.
4 – On the line of the dataset you want to delete, click on the trash bin icon.
5 – Confirm the suppression by clicking on “Delete” a second time or cancel by clicking on “Cancel.”
Important: the data will be removed from the account as well as from all the maps where it had been added.
FAQ #
🟢 How can I create areas from data I’ve imported onto the map?
If you want to automatically generate multiple areas from a dataset (like an Excel file), “My Data” feature won’t be the right tool for the job. Instead, you’ll need to use the “Generate” tool, which is designed specifically for bulk area creation. You can find more details about how it works here.
🟢 What does the number of results shown after my import represent?
The number shown in purple represents the number of points from your file that fall within the area.
The number in grey indicates the total number of points in your file.
🟢 How can I tell if all my data imported correctly?
It’s easy: just check the colored status tag next to your dataset. It instantly shows whether all your rows were successfully integrated or if there are errors in your file (such as address issues, formatting, etc.).

🟢 Where can I see the total volume of data imported on my account?
To view your imported data, click the “Add Data” button. There, you’ll find a breakdown of the number of points for each file, as well as a global progress bar showing your account’s total import capacity.
To go further: